Discovering a leak during a heavy British Columbia storm can be a high-stress experience for any homeowner. Whether it is a slow drip or a sudden intrusion of water, the actions you take in the first hour can determine the extent of the damage to your home’s interior and its structural integrity. In the Greater Vancouver area, where atmospheric rivers and heavy rainfalls are common, being prepared for a roofing emergency is not just a suggestion: it is a necessity for property preservation.
While professional intervention is required for a permanent fix, knowing how to stabilize the situation is critical. This guide outlines the essential steps to manage a roofing emergency before a professional crew arrives on-site.
Immediate 3-Step Rescue: Stabilizing Your Interior
When water begins to enter your home, your primary goal is to contain the liquid and protect your belongings from secondary damage. Time is of the essence; water follows the path of least resistance and can quickly migrate from a ceiling into your walls, flooring, and electrical systems.
1. Contain the Drip and Protect Furniture
Immediately place a bucket or container under the leak. If the leak is occurring near electronics, expensive furniture, or heirlooms, move these items to a dry area of the house. Covering heavy furniture that cannot be moved with plastic sheeting can provide an extra layer of defense against splashing or spreading moisture. Remember that a single drip can eventually lead to gallons of water; ensure you check the bucket frequently to prevent overflowing.
2. Relieve Water Pressure (The Ceiling Puncture)
This is perhaps the most counterintuitive but vital step. If you notice a “bubble” or bulge in your drywall ceiling, it means water is pooling behind the paint or the drywall paper. If left alone, the weight of the water will eventually cause a large section of the ceiling to collapse, potentially causing injury or massive property damage.
Use a screwdriver or an ice pick to carefully puncture a small hole in the center of the bulge. This allows the trapped water to drain into your bucket in a controlled manner, relieving the weight on the drywall and preventing a catastrophic collapse.
3. Dry the Area
Use towels to soak up any standing water on floors to prevent damage to hardwood or carpets and to reduce the risk of slip-and-fall accidents. If the leak has affected a large area of carpet, consider using a wet-dry vacuum to extract as much moisture as possible before mold has a chance to take root.

Storm Damage Assessment: Safe Inspection Strategies
Safety is the highest priority during a storm. You should never attempt to climb onto a wet, slippery roof during active rain or high winds. Falls from roofs are a leading cause of residential construction injuries, and the risk is amplified during inclement weather. Instead, perform a “Ground-Level Assessment” to understand the scope of the problem.
Visual Inspection from the Yard
Use binoculars or your smartphone camera’s zoom to scan the roof from the safety of the ground. Look for obvious signs of failure that may have caused the leak.
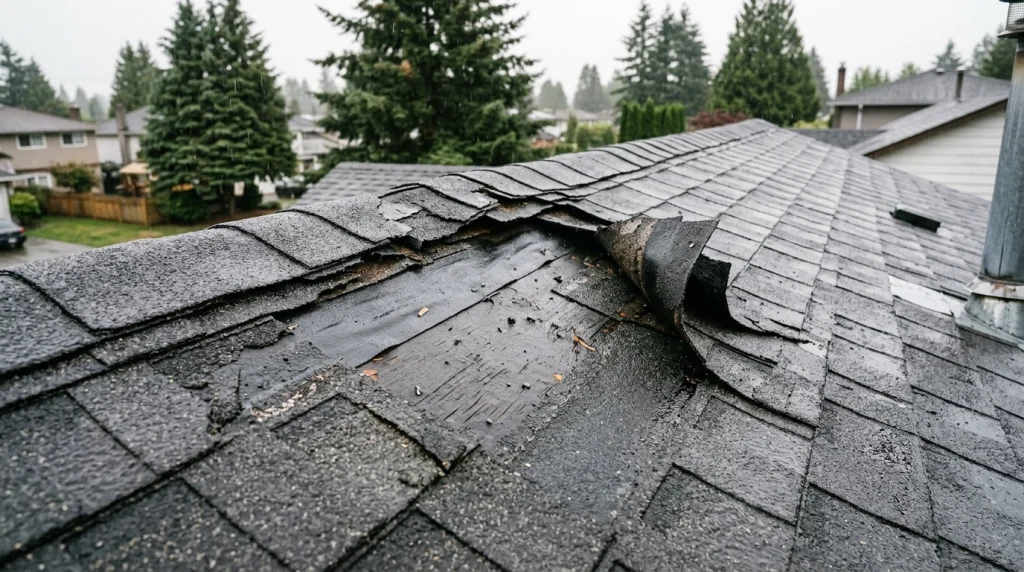
- Identify Missing Shingles: Look for “bald spots” where the darker underlayment or plywood is visible. Finding shingles in your yard after a windstorm is a definitive sign that your roof’s waterproof integrity has been compromised.
- Check Flashing and Debris: Look for lifted metal flashing around chimneys, vents, or skylights. Also, check for heavy tree branches that may have impacted the roof surface.
- Identify “Wind Uplift”: Even if shingles are present, they may have been loosened by high winds. These “tabs” may look normal from a distance but are no longer sealed, leaving them vulnerable to the next gust of wind.

The Tarping Process: Temporary Protection and Its Limits
In many cases, a permanent repair cannot be performed until the roof surface is dry. Emergency Roof Tarping is the standard professional solution to bridge this gap between the storm and the repair.
The Purpose of a Tarp
A heavy-duty waterproof tarp is secured over the damaged area to shed water away from the leak point and prevent further saturation of the roof deck. This acts as a temporary “umbrella” for your home.
Professional Installation
At JBC Roofworks, we secure tarps using wooden “furring strips” to ensure the tarp does not blow away in the next windstorm. This is a much more secure method than simply weighting the tarp down with bricks or sandbags, which can actually cause more damage to the shingles.
Understanding the Limits
It is important to remember that a tarp is a temporary measure only. It is designed to buy time until the weather clears for a permanent repair. Prolonged use of a tarp can trap moisture underneath, leading to mold or accelerated wood rot. If you are experiencing a leak, you should seek emergency roof repair in Vancouver as soon as the weather permits.

Insurance & Documentation: Preparing for Your Claim
Documentation is vital for a successful insurance claim. In British Columbia, most homeowner policies cover “sudden and accidental” damage caused by storms, but they require proof of the damage and evidence that you took reasonable steps to mitigate further loss.
- Capture the Interior Damage: Take high-quality photos and videos of the leaking ceiling, wet flooring, and any damaged personal property. Be sure to capture the “bubble” before you puncture it if possible.
- Photograph the Exterior Signs: Capture images of shingles on the ground or the damaged section of the roof from the yard.
- Keep a Paper Trail: Retain copies of all receipts related to emergency mitigation, such as buckets purchased or professional emergency tarping fees. Most insurance companies will reimburse these “loss mitigation” expenses.
- Detailed Damage Report: Ask your roofer to provide a professional assessment report. When you book a Post-Storm Damage Assessment, our experts provide a detailed breakdown that clearly identifies wind or storm damage to support your claim with the insurance adjuster.

Conclusion: Don’t Wait for the Next Storm
A leaking roof is a ticking clock. What starts as a small stain on the ceiling can quickly evolve into structural rot, mold colonies, and electrical hazards. By following the “Contain, Relieve, and Document” strategy, you can protect your investment while waiting for professional help.
At JBC Roofworks, we have over 20 years of experience helping homeowners navigate the challenges of Vancouver’s volatile weather. Our team is fully licensed, insured, and committed to providing quality without compromise.
Do you have an active leak or storm damage? Do not wait for the next rainfall to cause more damage.
- Contact JBC Roofworks immediately for Emergency Roof Tarping.
- Schedule your Post-Storm Damage Assessment today.
Frequently Asked Questions
How long can a tarp stay on my roof?
A professional tarp installation can last several weeks, but it should be replaced with a permanent repair as soon as the weather allows. Tarps are not UV-resistant for long periods and can become brittle.
Will insurance cover the cost of a new roof?
If the damage was caused by a sudden event like a windstorm or a fallen tree, insurance typically covers the repair or replacement. However, they rarely cover leaks caused by old age or lack of maintenance.
Can I tarp the roof myself?
We strongly advise against it during a storm. The combination of height, wind, and slippery surfaces is extremely dangerous for anyone without professional safety equipment and training.